Posts

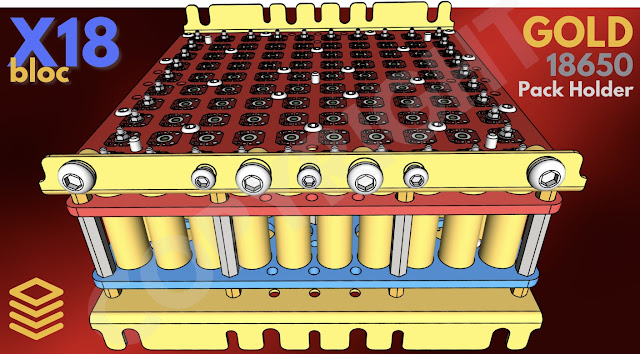
P1) 416 Open Frame Power Pack Kit (It's Time)

Image
Open Frame Power Pack Kit 416 (OFPPk) for  18650 batteries – 64P It’s Time Having learned from S econdlifestorage forum and DIY Powerwall, Jehu Powerwall fb group and many others, there's many DIYers is building their own Powerwall at home which take advantage of the low cost and free used batteries from laptop or e bike. Once reprocess and reconfigured, they can use for their home Powerwall usage without the need to use the grid supply. Is a alternative solution to have a off-grid or grid-tie system. Making DIY battery pack is a relatively time consuming process... from searching, breaking, cleaning, charging, discharging, capacity sorting, testing, building and final assembly and connecting until Power ON. It takes many days or months to accomplish all the tasks. If any of the tasks can be simplified, then it will save hours during the final stages for the assembly process. Most process flow is DIY or self-planned. Not everyone has a proper tool or facilities t

X18 Bloc (Solderless 18650 Battery Holder)

Image
Production & Fabrication file available: HERE  

X18 Bloc Fab file Ordering

Image
X18 ORDERING Production & Fabrication  File    Includes: 1) U-Plate & O-Plate folder which includes 3D step file, 2D DXF, PDF & JPG file. 2) Accessories folder which includes PDF & dimensions. 3) Complete BOM in excel format with 8s & 16s build set part quantities. 4) Assembly Instructions & drawing.  Bonus: Complete Gerber & BOM production files for Fuse PCB.  Rates: X18 Bloc Fabrication file: Special Price @ US$150 Send me a email on your interest.  Takes 1-3 days to process.  Accept Paypal & Wise Transfer danlim_98@yahoo.com or https://paypal.me/danlim98 Please note that once your order is placed, there's  no cancellation or refund . Fabrication file are strictly or own used only.  No transfer is allowed.  No Commercial  produce is allowed.  Send me a email first before you do up the payment. Note: The complete zip file will have approximate 20Mb size, please check your email attachment capacity can be supported. Else I need to spit into 2 parts.

P9) 416 OFPPk (Labels and Insulator)

Image
INSULATOR COVER To protect the live connection, a insulated paper cover will be provided. It can easily removed during maintenance of the pack. This cover also add as an area for pasting labels. LABELS Labels in any product is a important indication of what the product is made off or when is manufactured. In DIY powerwall, the process duration takes times. As such, many spend a lot of time recording individual cells after the capacity is done. Thats about it. Given the ability to indicate each pack with labels will helps to identify the pack capacity, build date, polarity... or any customise logo, names... anything you can add in to personalize the labels. Is that cool... In order to kick start some of the labels or Indications, I created 20+ templates for everyone who wish to include those labels within the 416 pack. This labels can be printed in A3 size paper and cut to size and paste it in the insulator cover area. In the labels, you can specify the build Month, P

P201) 416 OFPPk (Buy)

Image
416 OFPPk Fabrication Design File   Includes: 1) Complete BOM in excel format with different build set part quantities.  2) Individual folder items which includes 3d file, pdf, jpg & dxf for the main plates.  3) Main Assembly drawing.  4) Assembly Instructions.  5) Updated drawings.  Rates: 416 OFPPk file: US$150 + $5%PayPal Send me a email on your interest.  Takes 1-3 days to process.  My Paypal danlim_98@yahoo.com or https://paypal.me/danlim98 Please note that once your order is placed, there's  no cancellation or refund . If you have any areas that need to clarify, kindly send me a email below: Daniel Email: danlim_98@yahoo.com Join us at :  416 OFPPk Facebook Group Features and Installation Standard Configuration Power Configuration Cell Fusing Build Arrangement Labels and Insulator

P2) 416 OFPPk (Design & Development)

Image
Design & Development First and foremost, the design will need to be simple.  I t takes more brains power to be simple than more complex design. Simplicity is rather not easy to come by.  Many considerations have put into this simple and yet it needs to fulfill the basic feature. Simple will also mean that each part will have more functions on its own. That'll also means less part to take care and less part to assemble.  Another most important consideration is the user.  Can the user assembled easily without much effort?  Can the user change the configuration?  Does it allow future expansion? Is it fused? This are some of the important question during the design phase... anything is possible or omitted. Basic Battery Pack Design Generally, most DIYer or battery maker will have their battery pack mounted in the battery holder like this picture below. After which they put the nickel strip, spot-welded or soldered it to the bus wire. This is a proven design

P3) 416 OFPPk (Features & Description)

Image
FEATURES No soldering or spot weld required. Assemble and Disassemble the pack easily with only 14 long screws, nuts and guide plate.  Assembly time per pack (64P) only takes 15 minutes or less.  Easy to interconnect between packs, no need for bus-bar. Easy to connect to BMS or external load thru 10 * M5 screws on each pack. Easily expandable by interconnecting using the connecting plates. More connecting plates can be added to increase the current flow. Nickel Contact "Fuse" can be placed on the positive or negative end side. Ample air ventilation without any blockage of airflow. Easy visual troubleshooting with the use of transparent plates. Provide huge Red & Green coloured protective insulated cover, double as polarity indicator. Self design custom labels and logos. Include template link. Purely hardware, no electronics, no circuit board, no connectors and soldering to deal with. Hold 64 18650 cells on each pack. BUILD EXPANSION Starting fr

P4) 416 OFPPk (Beginner Configuration)

Image
416 BEGINNER CONFIGURATION Every DIYer need to start some where, they do not have lots of battery available during that point of time, as such to built a big powerwall may takes a while. With a single 416 pack, you can configure to becomes a 4S 16P configuration. This is great for small equipment or simple startup process for testing. When the time comes, just revered back to the original and start building using the Standard configuration method. No need to build another new system.  (A instruction link will be provided upon request for this conversion.) Pack Calculator Assuming using: 18650, 3.7-4.1V, 2200mAh, Weight 45g (Battery Not Included) (4S 16P) Configuration (1Pack ÷ 4)   = 4S 16P Voltage Range: ~14.8V-16.4V Watt Hours: 520Wh - 570Wh Battery Needed : 64 pcs Complete Weight: ~3kg 1 x Unit Dimension: (L400 x W98 x H83 mm) Overall using 416 pack, you can maintain the same build concept through out the entire system. It's a time saver and also you can add s

P5) 416 OFPPk (Standard Configuration)

Image
416 STANDARD CONFIGURATION With a single (1S) 416 pack, you can add more to configure to 3S, 4S, 7S & 14S. Or any number of pack you required just by "Series" the pack together. Treat a whole pack like a battery with + & - terminal. Linking between pack can be done easily with Nickel Connect plate. Cabling is a option. Pack Calculator Assuming using: 18650, 3.7-4.1V, 2200mAh, Weight 45g (Battery Not Included) (3S 64P) Configuration (1S) + (1S) + (1S)  = 3S 64P Voltage Range: ~11.1V-12.3V Watt Hours: 1500Wh - 1700Wh Battery Needed : 192 pcs Complete Weight: (~3kg x 3 ) 9kg 3 x Unit Dimension: (L400 x W98 x H83 mm) (4S 64P) Configuration (1S) + (1S) + (1S)   + (1S)  = 4S 64P Voltage Range: ~14.8V-16.4V Watt Hours: 2000Wh - 2300Wh Battery Needed : 256 pcs Complete Weight: (~3kg x 4 ) 12kg 4 x Unit Dimension: (L400 x W98 x H83 mm) (7S 64P) Configuration (1S) + (1S) + (1S)   + (1S) + (1S) + (1S)   + (1S)   = 7S 64P Voltage Range: ~25.9V-28.7

P6) 416 OFPPk (Power Configuration)

Image
416 POWER CONFIGURATION With Power configuration, the capacity will be double as it adds more parallel packs to the existing configuration. When the stack increase, it can be rotated for a direct back to back mounting. Still using back the 10 screws.. is that simple. No wire or cable is needed. (Option screws is required) Pack Calculator Assuming using: 18650, 3.7-4.1V, 2200mAh, Weight 45g (Battery Not Included) (3S 128P) Configuration (1Sx 2 ) + ( 1Sx 2 )  + ( 1Sx 2 )   = 3S 128P Voltage Range: ~11.1V-12.3V Watt Hours: 3000Wh - 3400Wh Battery Needed : 384 pcs Complete Weight: (~3kg x 6 ) 18kg 6 x Unit Dimension: (L400 x W98 x H83 mm) (4S 128P) Configuration ( 1Sx 2 )  + ( 1Sx 2 )  + ( 1Sx 2 )    + ( 1Sx 2 )   = 4S 128P Voltage Range: ~14.8V-16.4V Watt Hours: 4000Wh - 4600Wh Battery Needed : 512 pcs Complete Weight: (~3kg x 8 ) 24kg 8 x Unit Dimension: (L400 x W98 x H83 mm) (7S 128P) Configuration ( 1Sx 2 ) + ( 1Sx 2 )  + ( 1Sx 2 )    + ( 1Sx 2 ) + ( 1

P7) 416 OFPPk (Cell Fusing)

Image
CELL FUSING Individual Cell fusing can be easy and can go very complex. To fused a single or a number of cells is not a issue. Off-the shelf product is more than enough. To fused a few hundred of cell will need a different approach. In order to implement it on the 416 pack, have done some research and look for readily made product. eg: SMT fuse, Glass fuse, Flat fuse.... all sort of fuses that come close to what I intend to use. Electrically it may be alright, physical dimension doesn't really match and required some amendment to the existing design. No practical and the cost really adds up. In search of solution, while gathering some information in the community, I realize that the fuse rating can be higher than the cell discharge or charge rating.. It is to prevent overly charge or discharge situation. If the fuse rating is very close or exact to the maximum value. It may blow too easily and cause undesirable loading on the BMS. Moreover, all the powerwall packs will be